

An Easy No-Bake Icebox Cake Recipe for Birthdays

Makes: 8 Servings
Per Serving: 20g Protein | 343 Cal

There’s nothing as fun for a birthday or celebration as rainbow sprinkles. They’re just so fun and festive! To celebrate my birthday this year, I decided to play around with a special icebox cake that would feel perfect for a birthday party. Being me, I had to make sure it was also high in protein. This is my high-protein sprinkle icebox cake recipe and no matter how old you’re turning, you’re going to absolutely love it.
No-bake, easy to make, and packed with over 20g of protein per slice, it’s the perfect macro-friendly birthday treat.
Why You’ll Love This High-Protein Sprinkle Icebox Cake Recipe
It doesn’t require any cooking or baking: A birthday cake that you can just mix up, assemble, and stick in your fridge or freezer? That’s my kind of birthday cake! Make sure you have a springform pan for the easiest way to serve it.
Packed with plenty of protein: This easy recipe is one birthday treat that also packs a protein punch, thanks to cottage cheese or Greek yogurt and protein powder.
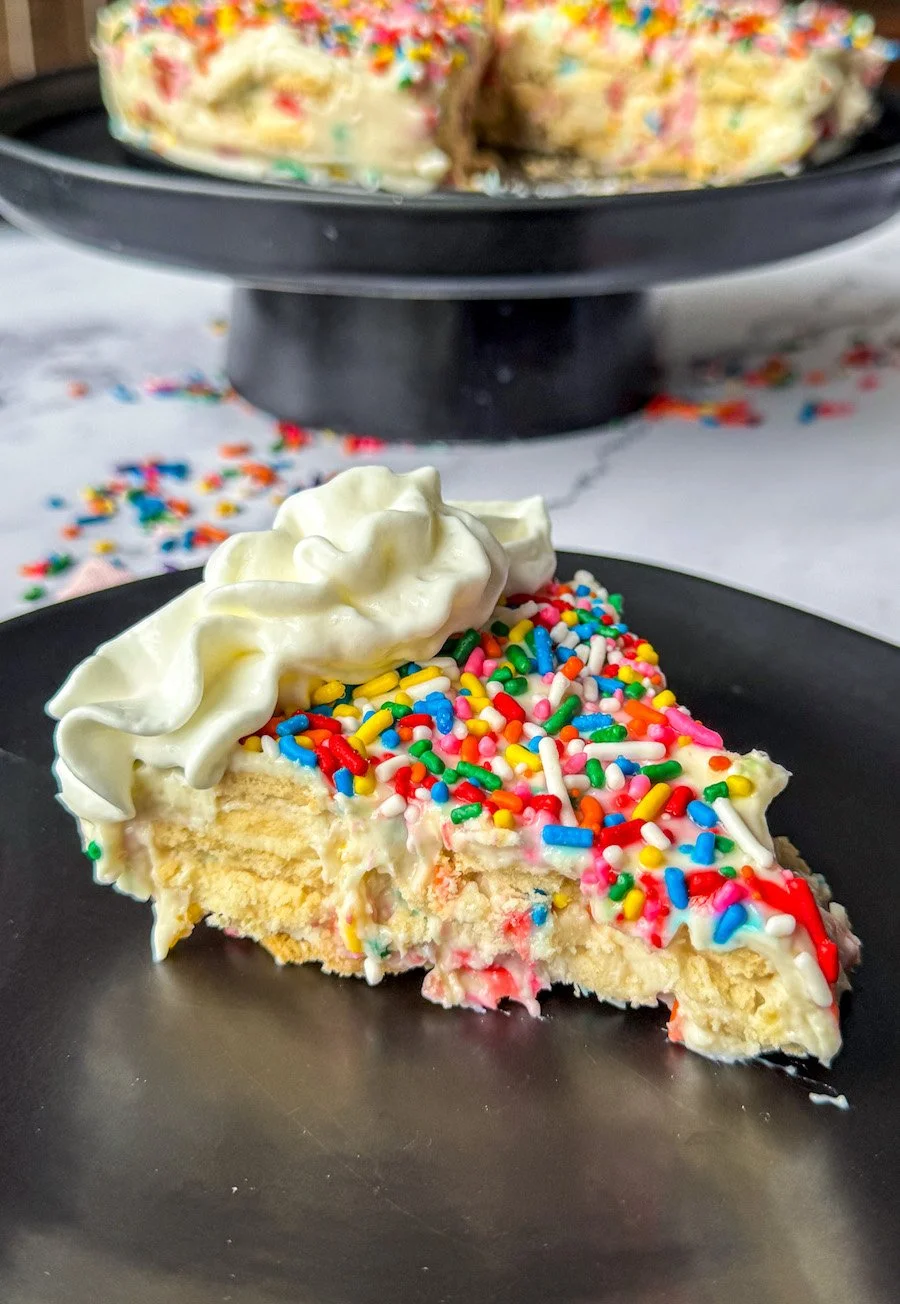
Tastes just like a birthday cake: We use golden sandwich cookies, whipped topping, and, of course, plenty of rainbow sprinkles for a treat that actually tastes like a birthday cake.
Super fun and so celebratory: The rainbow sprinkles add plenty of fun to this healthy birthday treat.
Great for making ahead of time: Icebox cakes are ideal for making in advance because they set up overnight and slice perfectly the next day.

Ingredients
2 boxes Golden Oreos (about 32 cookies), halved
2½ cups cottage cheese or Greek yogurt (I prefer cottage cheese for extra creaminess and higher protein.)
3 scoops vanilla whey protein powder
2 cups Coco Whip or Cool Whip
¼ cup pure maple syrup
2 tablespoons vanilla pudding mix
¾ to 1 cup rainbow sprinkles
Instructions
Prep the cookies: In an icebox cake, the cookies act as your cake layers. Make sure all of the cookies are split in half. Line the bottom of a springform pan with cookie halves in an even layer.
Make the filling: Add the cottage cheese (or Greek yogurt), protein powder, whipped topping, maple syrup, and vanilla pudding mix to the bowl of a food processor or high-speed blender. Blend until smooth and creamy. You can also use an electric hand mixer, but it may not get the filling quite as smooth. If you're using a hand mixer, whip on medium speed until creamy.
Add the sprinkles: Transfer the pudding mixture to a large bowl and fold in the rainbow sprinkles with a rubber spatula. Avoid overmixing to prevent the colors from running as much as you can.
Layer the icebox cake: Spoon about ⅓ of the creamy filling on top of the cookies in the bottom of the pan. Top with another layer of cookies, then another ⅓ of the whipped cream mixture. Top with more cookies and finish with the last ⅓ of the filling. Sprinkle extra rainbow sprinkles over the top if you’d like.
Chill: Tightly cover the cake with plastic wrap and transfer to the fridge. Chill the icebox cake for at least 2 hours, but preferably overnight. You can also freeze the cake if you’d prefer.
Serve: Take the springform ring off the pan, slide the cake onto a serving platter, use a sharp knife to slice the cake into 8 slices, and add a little extra whipped cream if you’d like. Enjoy!
Nutrition Information (Per Serving - Makes 8 Servings)
Calories: 343
Protein: 20g
Carbs: 38g
Fat: 13g
My Best Icebox Cake Tips
Make sure you use a high-speed blender or food processor: If you use something with less power, you won’t get the smooth filling we’re after.
Taste and adjust sweetness as needed: Different protein powders have different sweetness levels, which means you might need more or less than is called for in the recipe.
Chill the cake overnight: This will give you the best texture (it's the best part!).
Swaps & Substitutions
Add some crunch: Top your icebox cake with crushed cookies, white chocolate chips, freeze-dried fruit, or even nuts for a crunchy topping.
Add fresh fruit: Fold fresh strawberries or fresh raspberries into the filling for a twist. You could also top your cake with fresh berries if you'd like.
Make it chocolate: Love chocolate? No problem! Use chocolate cookies and chocolate pudding mix (you could also add a little cocoa powder) for a chocolatey take on this recipe. You could also drizzle chocolate ganache over the whole cake. Yum.
Give it a citrusy kick: Swirl lemon curd through the filling for a hit of tart lemon flavor.
Make them mini: Instead of one big cake, assemble mini versions in small jars for single-serve desserts.
FAQs
-
If you’re dairy-free, you can make this recipe using a thick, plant-based Greek-style yogurt or blended silken tofu in place of the cottage cheese. Use a dairy-free whipped topping, and make sure your protein powder is vegan. You’ll still end up with a creamy, dreamy dessert.
-
If you cover your cake tightly with plastic wrap or store it in an airtight container, it should stay fresh for up to 4-5 days in the fridge. You’ll want to protect it a bit to keep it from drying out.
-
It sure does! I’d recommend slicing your cake first, then wrapping each slice individually and storing in an airtight container or freezer-safe plastic baggie before transferring to the freezer. Your cake should stay fresh for up to 2 months. When you’re ready to eat, you can let a slice thaw a bit in the fridge before serving it or enjoy it slightly frozen.
-
I’d recommend using a vanilla whey protein powder or a whey-casein blend because it’ll give you the best flavor and texture. If you’d prefer, you can use a plant-based protein powder instead, but you may need to add a splash of milk or extra whipped topping to get the right consistency.
-
You can use just about any cookie you love. Go for chocolate sandwich cookies for a cookies-and-cream cake, try Nilla wafers, Nabisco famous chocolate wafers, Biscoff cookies, graham crackers, even crispy thin oatmeal cookies to switch things up.
-
No, you don’t! If you’d prefer to use a regular cake pan, that’s totally fine. It’ll be easier to get the cake out of a springform pan than other pans, however, so that’s why I’d recommend using it if you have one.
Whether you’re celebrating a birthday or just looking for a fun, healthy, and easy make-ahead dessert to have on hand this weekend, you have to try this newest icebox cake recipe. It's the perfect dessert for special occasions of all kinds. Creamy, delicious, and totally macro-friendly, this cake is fun, festive, and so joyful.

Sprinkle Icebox Cake
This icebox cake recipe couldn’t be more perfect for birthday celebrations. Filled with sweet vanilla cookies and studded with tons of rainbow sprinkles, it’s a wholesome way to celebrate your special day.
Ingredients
- 2 boxes Golden Oreos (about 32 cookies), halved
- 2½ cups cottage cheese or Greek yogurt (I prefer cottage cheese for extra creaminess and higher protein.)
- 3 scoops vanilla whey protein powder
- 2 cups Coco Whip or Cool Whip
- ¼ cup pure maple syrup
- 2 tablespoons vanilla pudding mix
- ¾ to 1 cup rainbow sprinkles
Instructions
- Prep the cookies: In an icebox cake, the cookies act as your cake layers. Make sure all of the cookies are split in half. Line the bottom of a springform pan with cookie halves in an even layer.
- Make the filling: Add the cottage cheese (or Greek yogurt), protein powder, whipped topping, maple syrup, and vanilla pudding mix to the bowl of a food processor or high-speed blender. Blend until smooth and creamy. You can also use an electric hand mixer, but it may not get the filling quite as smooth. If you're using a hand mixer, whip on medium speed until creamy.
- Add the sprinkles: Transfer the pudding mixture to a large bowl and fold in the rainbow sprinkles with a rubber spatula. Avoid overmixing to prevent the colors from running as much as you can.
- Layer the icebox cake: Spoon about ⅓ of the creamy filling on top of the cookies in the bottom of the pan. Top with another layer of cookies, then another ⅓ of the whipped cream mixture. Top with more cookies and finish with the last ⅓ of the filling. Sprinkle extra rainbow sprinkles over the top if you’d like.
- Chill: Tightly cover the cake with plastic wrap and transfer to the fridge. Chill the icebox cake for at least 2 hours, but preferably overnight. You can also freeze the cake if you’d prefer.
- Serve: Take the springform ring off the pan, slide the cake onto a serving platter, use a sharp knife to slice the cake into 8 slices, and add a little extra whipped cream if you’d like. Enjoy!
Nutrition Facts
Calories
343Fat
13 gCarbs
38 gProtein
20 g